Tracking Down and Testing the Camera from ‘Rear Window’ (1954)
My hobby is film photography, which involves collecting interesting cameras, taking photos, printing pictures, and so on. Within this fairly common hobby though I have a particular niche interest, which is tracking down and trying out cameras that feature in film and media.
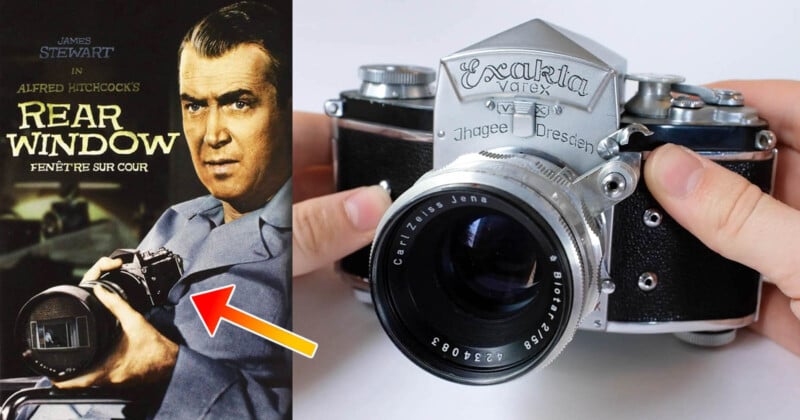
If you don’t know, Rear Window is the story of a professional photographer who is confined to his apartment for several months having broken his leg in a photography-related accident.
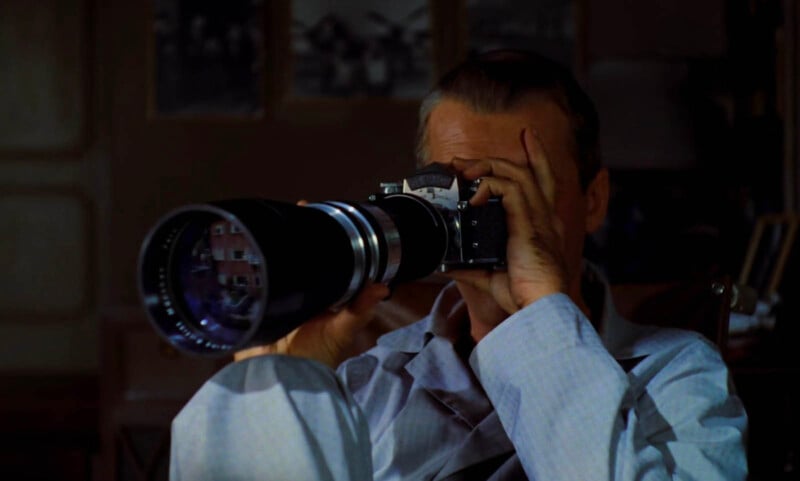
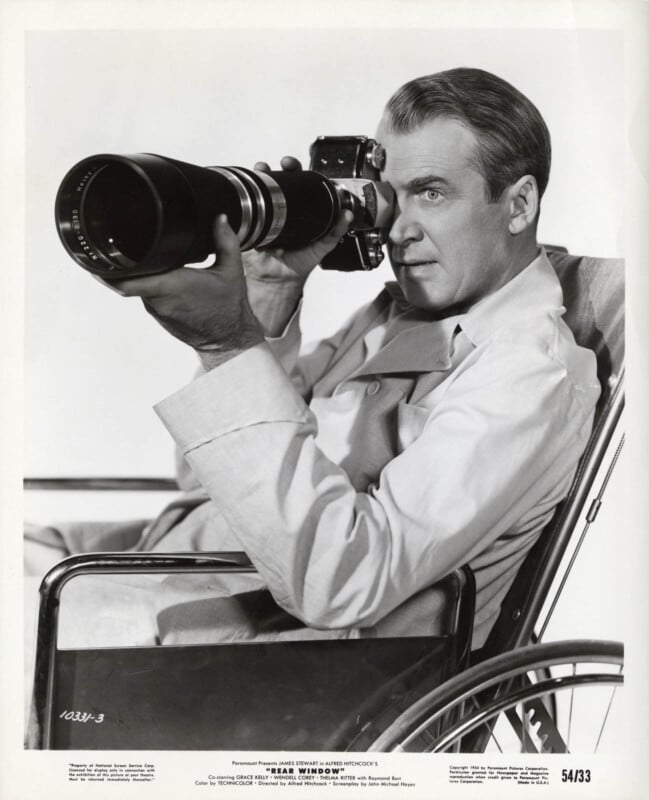
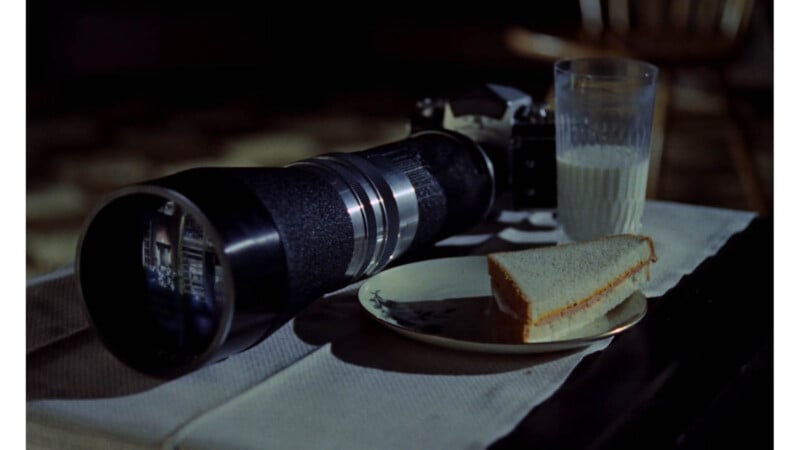
Bored out of his mind with nothing else to do he begins to pass the time by watching his neighbors through the rear window of his apartment, and to watch more closely he brings out a particularly attractive camera with a telephoto lens, which is his constant companion for the rest of the film.
The film deals with ideas like privacy, perception, voyeurism, and so on, and as someone interested in photography and the history of photography I’ve always been a big fan, and more or less as soon as I first saw Rear Window I wanted to try to find out the model and make of the camera and lens and to replicate and try out James Stewart’s character’s setup – especially as (as far as I know) no one’s tried it before.
I’m going to take you through the journey of tracking down the lens and camera, and then go out and take some photos.
Part 1: The Camera
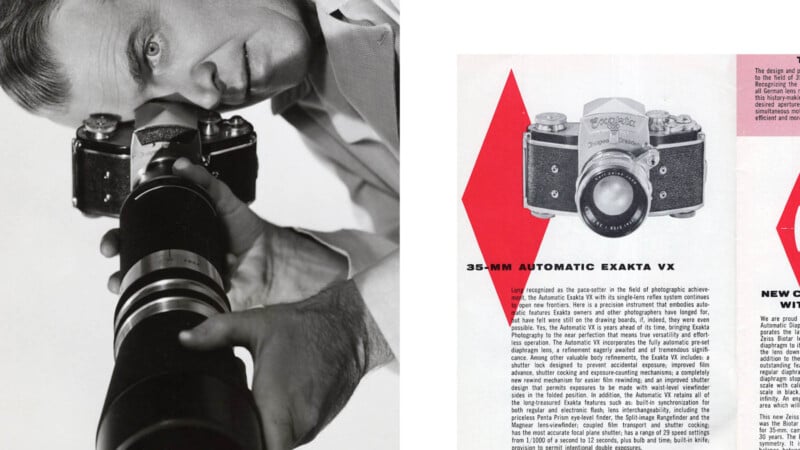
Not only does the camera have a lot of onscreen time where it’s very clearly visible, but there were also a lot of high-resolution publicity stills taken for the movie which feature James Stewart in costume posing with the camera, which I was able to find.
After a bit of research, looking at these images for reference, I found out that the camera was an Exakta VX 35mm SLR made by the Ihagee company out of Dresden, East Germany, in the mid-1950s.
Exakta
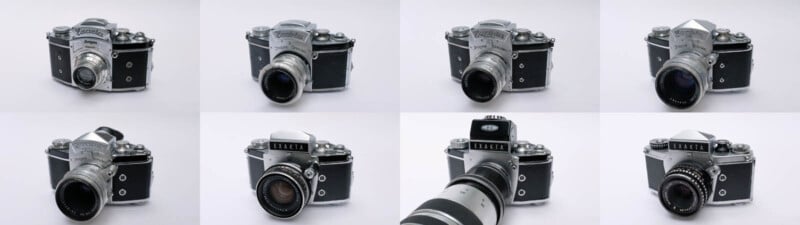
As I became more and more invested in this project I also became more and more interested in the Exakta line of 35mm SLRs, and eventually, I collected all eight of the major models and variations, manufactured from 1936 to 1970.
There are several reasons that I first became so interested in the Exakta line of cameras – like their unique design and build quality – but there’s also the great historical importance of Exakta, and before I go on to talk about the Rear Window camera I’ll just explain a bit about why Exakta is so important to the history of photography by talking a little bit about the first 35mm Exakta, the Kine Exakta, introduced in 1936.

The Kine Exakta has almost all the features that Exaktas became iconic for, like the trapezoidal shape and the fact that the shutter release button, the shutter speed dial, and the film advance lever are all on the left-hand side of the camera as you take a photo, which today looks very unusual. To tell the story of the camera fully, though, I first have to go back to 1889 when 35mm film was first invented.
We all know 35mm film (so-called for its width) today as the default type of film used in film cameras, but when 35mm film was invented in 1889 by William Dixon and Thomas Edison it was originally only for use in movie cameras. It was only decades later in 1925 that lens technology had advanced enough for 35mm stills cameras to be viable, and the first successful 35mm stills camera was the Leica I.
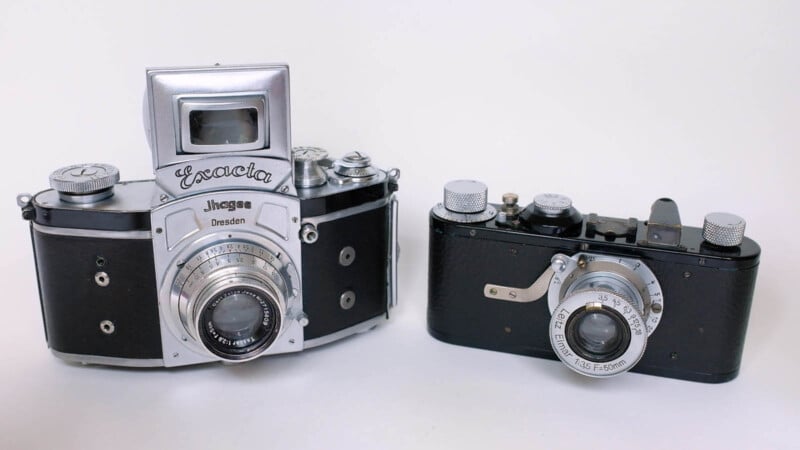
While it could be said to be the first modern camera, and perhaps the most important camera of all time, it is as you might expect quite basic in its functions. In terms of controls we have dials for focusing, aperture, and seven shutter speeds, and for composing your image just the very simplest type of viewfinder. It was only a decade later in 1936 that Exakta would make the next big step in the development of modern cameras with the first 35mm single lens reflex camera – or SLR.
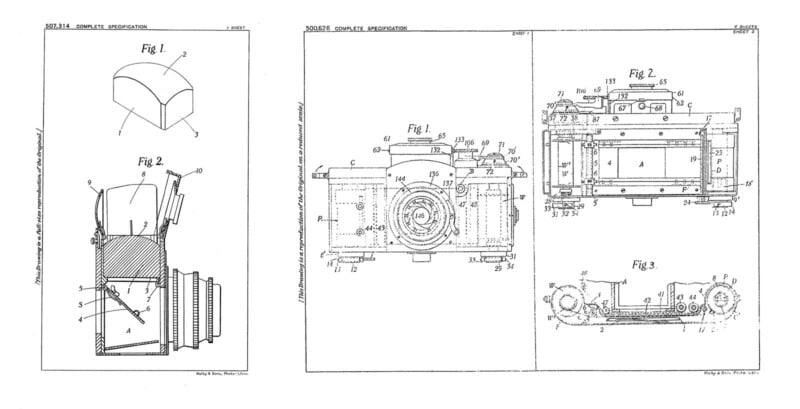
I’ll just briefly explain what an SLR is – it’s the type of camera where directly behind the lens you have a mirror held at 45° (as can be seen in the leftmost patent drawing above) and directly above the mirror you have a ground glass screen which is used for focusing and composing your image. That’s what the real benefit of SLRs is, that you get the most accurate possible preview of the final photo because you’re looking directly through the lens that’s about to take the picture. When you do press the shutter release button, the mirror flips up out of the way and the shutter triggers exposing your film.
SLR cameras had first been invented in the 1860s and since then had become fairly widespread. The real genius of the Exakta design though was the miniaturization of the SLR concept, combined with the convenience of 35mm film, plus the new high-quality lenses that meant you could get a decent image from a 24x36mm negative.
As well as all this though there were several other smaller innovations introduced with the Kine Exakta that made it particularly successful — for example, it was the first camera with a film advance lever which allowed you to wind on the film with a single stroke. With most of the cameras of the period you advanced the film by turning a knob.
It was also one of the first cameras with a quick-release bayonet mount which allowed you to swap out lenses much more quickly than with the normal screw mount.
It also had an unusually nice bright viewfinder, and in the decades after the release of the Kine Exakta the 35mm SLR, making use of many of these innovations, would become the default camera type.
At this point, you may be wondering what exactly went wrong – why did the Exakta line of cameras fail and why isn’t Exakta as well known as Leica is today? – well to explain that I’ll now look at the last Exakta that was made, the Exakta VX1000 made from 1967 to 1970.
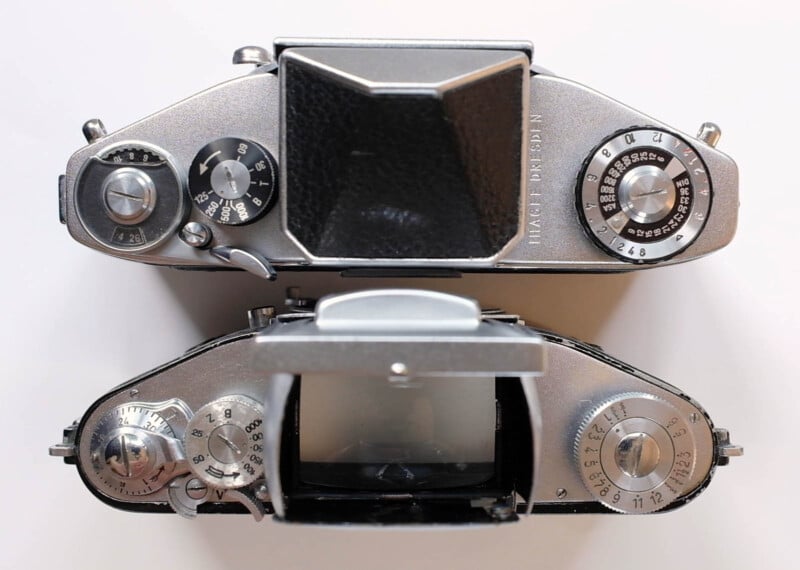
While it may look a bit more modern and even a bit more advanced than the Kine Exakta, in reality, most of the changes are superficial, and looking at the above top-down view of the two Exaktas you can see that the controls are nearly identical, no real additions, no real changes. The reality is that in 35 years there had only really been one or two very minor improvements to the Exakta.
One reason for the lack of innovation was that the real genius behind the Exakta, Karl Nüchterlein, was killed near the end of World War II, another reason was simply difficulties associated with operating a business in East Germany, which is where the Ihagee company based in Dresden, the makers of Exakta, found themselves situated after the end of World War II. And comparing this last Exakta to the much more advanced 35mm SLRs that were coming out of Japan in the 60s and with their through-the-lens metering and motor drives, it’s clear that by the early 70s, the Exakta had become obsolete.
The Rear Window Camera
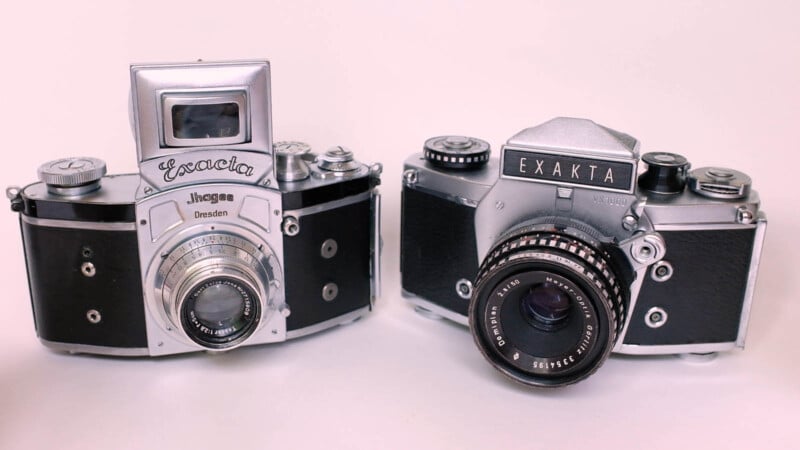
Going back to the mid-1950s it was the real height of Exakta’s success and dominance of the SLR market, and the latest Exakta camera was the Exakta Varex VX (or just Exakta VX), and I do think it was one of the most beautiful cameras ever made. The above camera was the very first Exakta VX I bought to try to replicate the Rear Window camera, and the lens is one of the camera’s standard lenses, the Biotar 58mm f/2.
Unfortunately, as I compared the camera more and more with the camera in the movie I soon discovered that although I had the correct model, the ‘VX ‘, the camera in the film was a slightly different version.
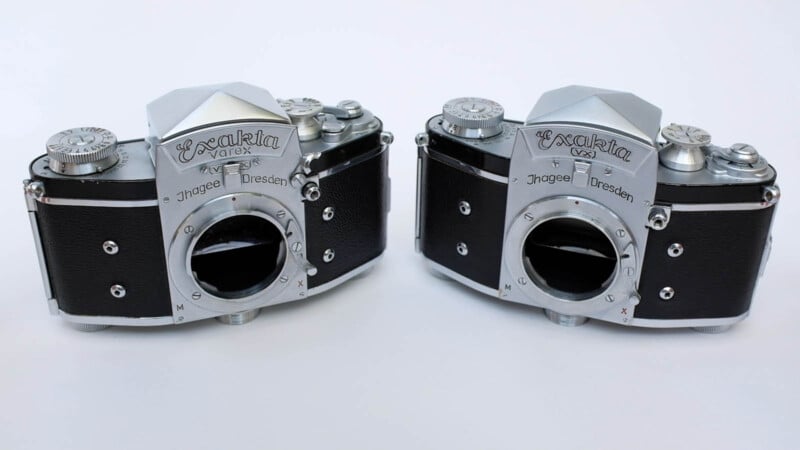
It turned out that my camera was one of the European versions of the Varex, while what I needed was one of the US-specific versions. I bought another camera from eBay’s US site which proved to be the correct version, and while they do look pretty much identical, there are quite a few small differences, and I’ll just quickly mention a couple of the largest of these differences.
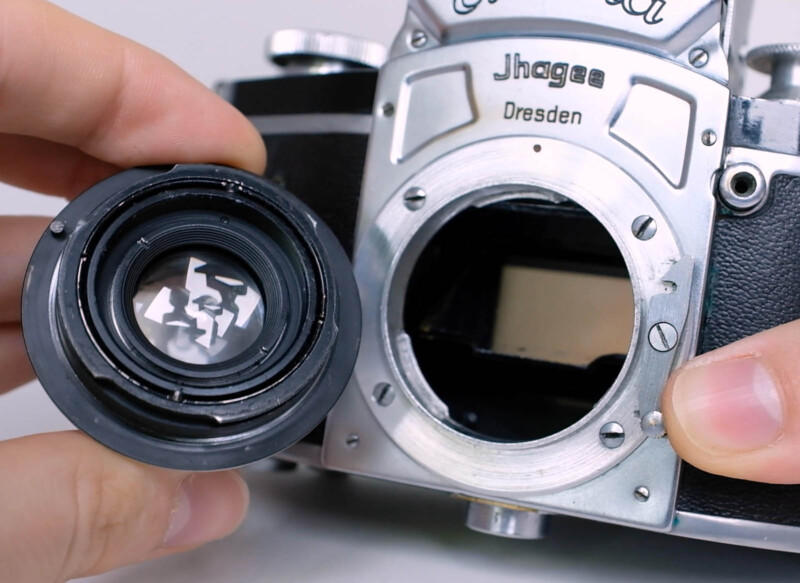
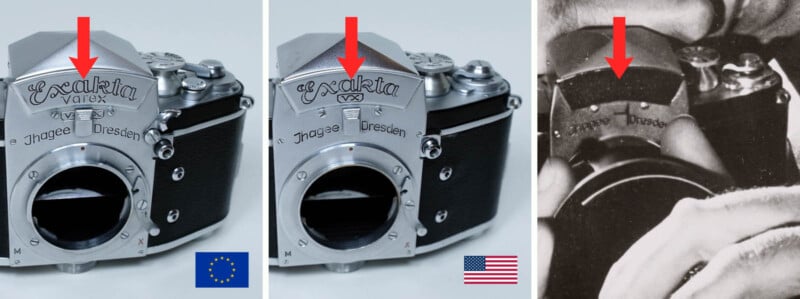
In the above image, I have the first Exakta VX I bought on the left (the incorrect European version), then in the middle the American version, and on the right a closeup of one of the publicity stills. First of all, there is one really obvious difference between both my cameras and the camera in the movie, and that’s just that while both of my cameras have a nameplate that says ‘Exakta’, the Rear Window camera just has a piece of black leatherette in its place – and that’s nothing to do with different versions of course, it’s just something that I suppose the props people added to the camera to obscure the branding, and I bought a piece of black leatherette which I later used to replicate this.
In regard to actual differences, you can firstly see that just below the nameplate on the European version where it says ‘Exakta Varex’, there’s this little ‘V’ and ‘X’ (‘Varex VX’ being the full name of the model), and on the Rear Window camera on the far right there’s no little ‘VX’ beneath the nameplate. You can see on the American version of the camera in the middle it’s the same as in the publicity still – the word ‘Varex’ has been removed entirely and the ‘VX’ has been pushed up onto the nameplate. The reason for this difference is just that the word ‘Varex’ was trademarked by someone else in the USA, and so in the US, the ‘Varex VX ‘was just called the ‘VX’.
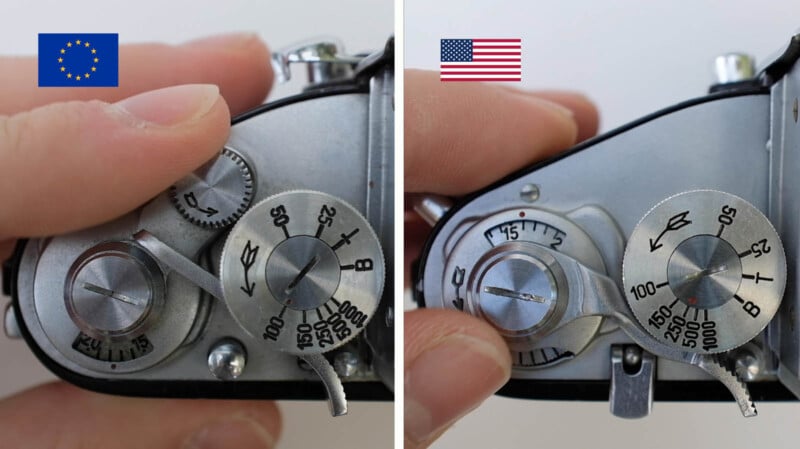
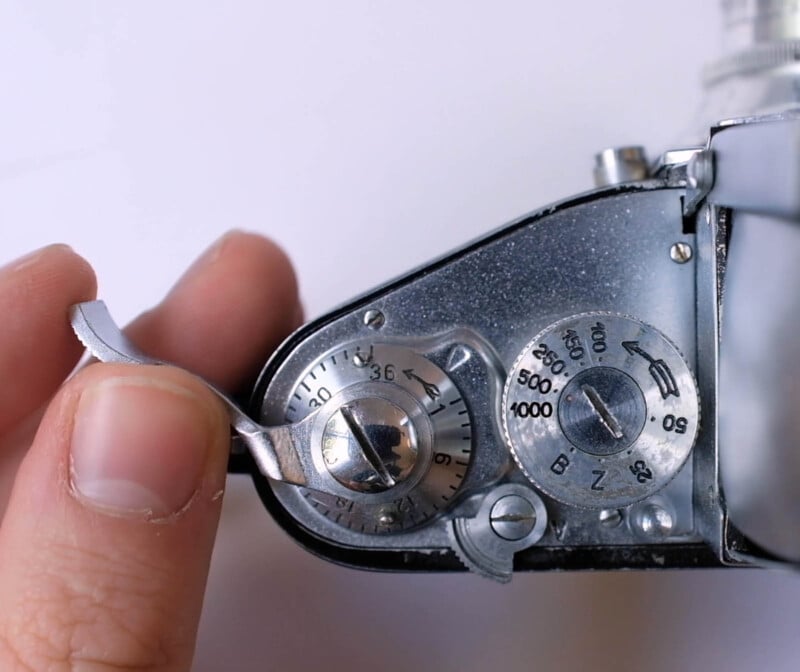
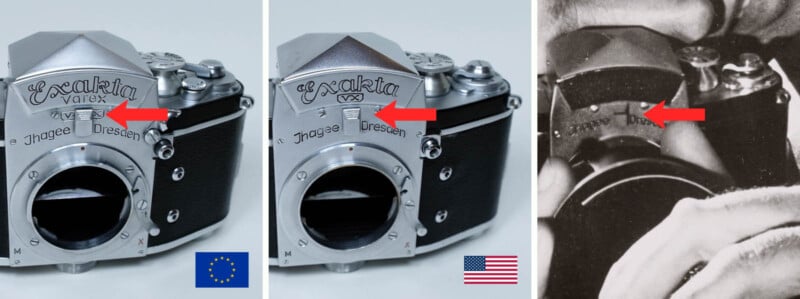
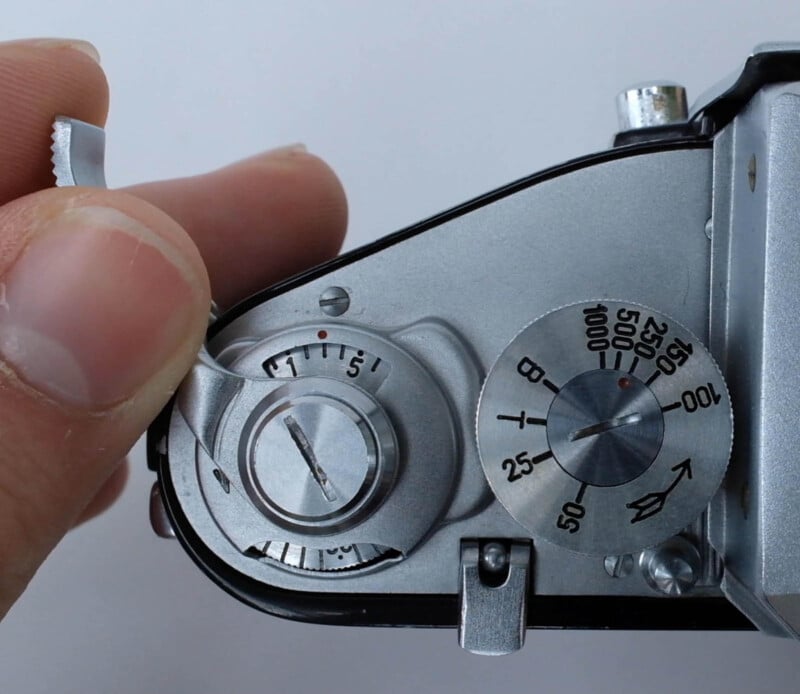
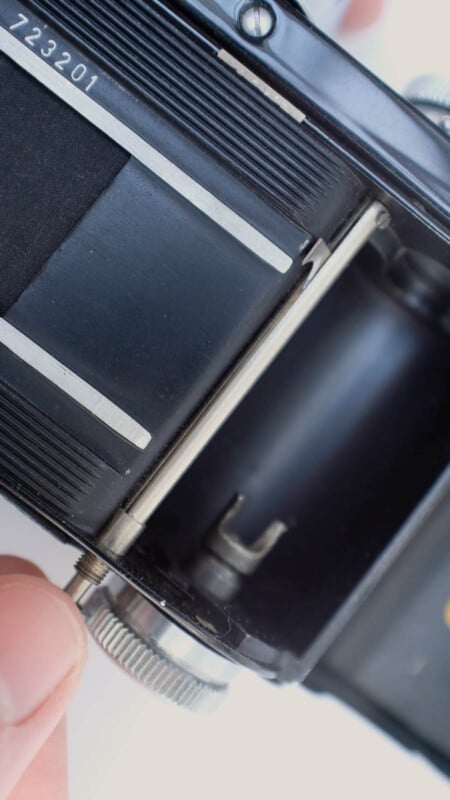
The other difference I’ll mention is that on my European camera, the controls are slightly different, and in particular there’s this strange wheel/knob that’s missing on the Rear Window camera and the US version of the camera.
In the close-up view of the area, the differences become more obvious. I’ll get more into the functions of the camera later on, I’ll just say now that the wheel is for setting the shutter counter to 1 when you’re starting a new roll of film, while on the American version (which is the earlier version) you just have a little cutout beneath the shutter counter, and you can change the number with your thumb (see above image).
We’ve now established that this American version of the camera is definitely the correct one. Unfortunately, though, I decided I wasn’t quite happy with the condition of the camera I had – just small things like missing paint and chewed up screw heads, and ideally, I did want a camera that was in as good condition as possible to match the Rear Window camera. I thus bought another one – but again found a few small faults – especially corrosion on some of the chrome parts, and with camera number three again many of the fastenings were quite badly chewed up, and camera number four had damaged leatherette.
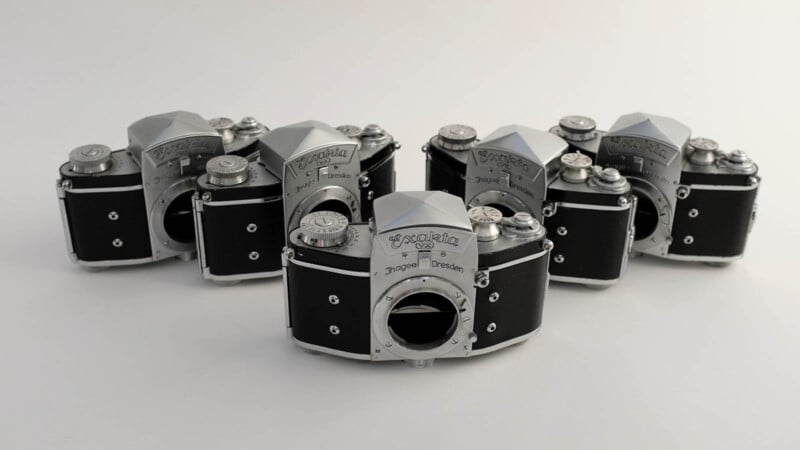
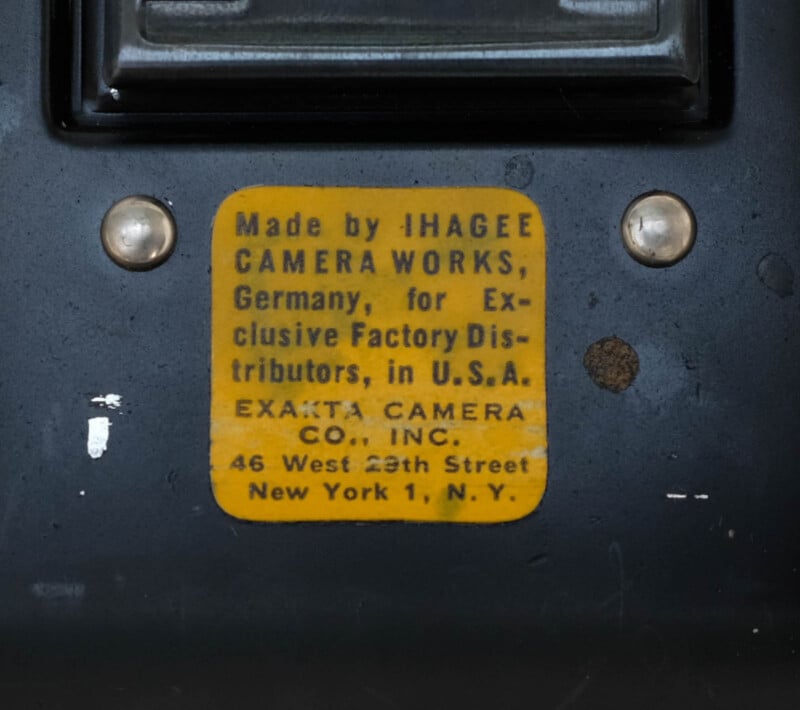
Fortunately, the fifth camera I bought was actually in very good condition – no damage or marks at all, it appears to be almost unused. Now that I have five of these cameras I’ll just mention a couple of interesting things – so they all have serial numbers which start either with 69 or 72 which makes it seem like all these are from two distinct batches made especially for US export, and it also signifies that these cameras were made from 1951 to 1953. They also each have this yellow sticker which just says that these cameras were “made for exclusive Factory distributors in U.S.A.” Surprisingly, all of these cameras appear to be fully working (although I can’t be sure without testing them with film), which is some testament to the cameras’ build quality.
The Camera’s Basic Functions
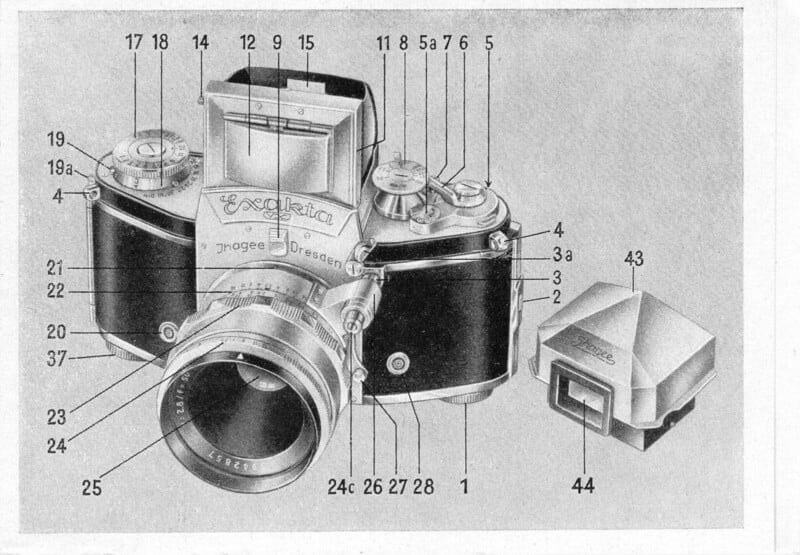
Now that I have my ideal Rear Window Exakta, I’ll run through its basic functions. Looking at the front as I’ve mentioned before you’ve got the shutter release button in this extremely odd location which takes a bit of getting used to.
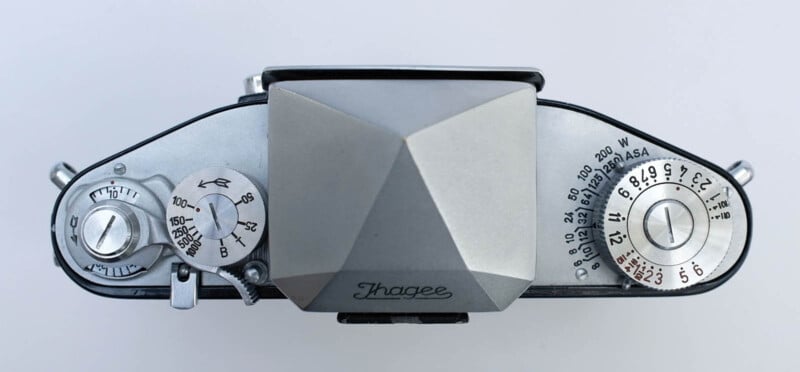
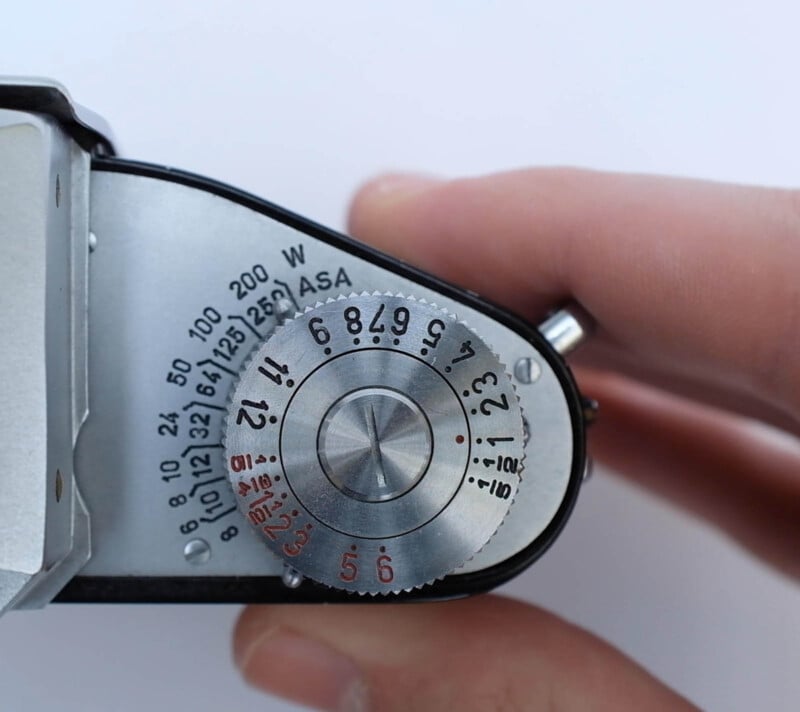
Looking from above, you have all the main controls – on the left of the camera there’s the frame counter, frame counter adjustment wheel, the shutter speed selector knob, shutter release, and the film advance lever (which you do have to turn unusually far) and you have options on this knob for everything from a 1/25th up to a thousandth of a second.
On the right of the camera are the slow speeds and self-timer knob – and to switch the camera over to slow speeds you have to first select the ‘B’ setting, and then the black numbers become your slow speed options, and the red numbers are your self-timer options.
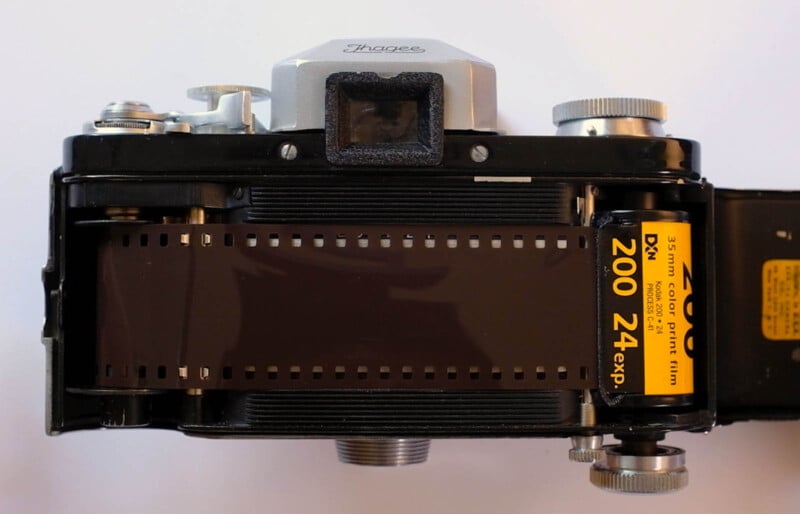
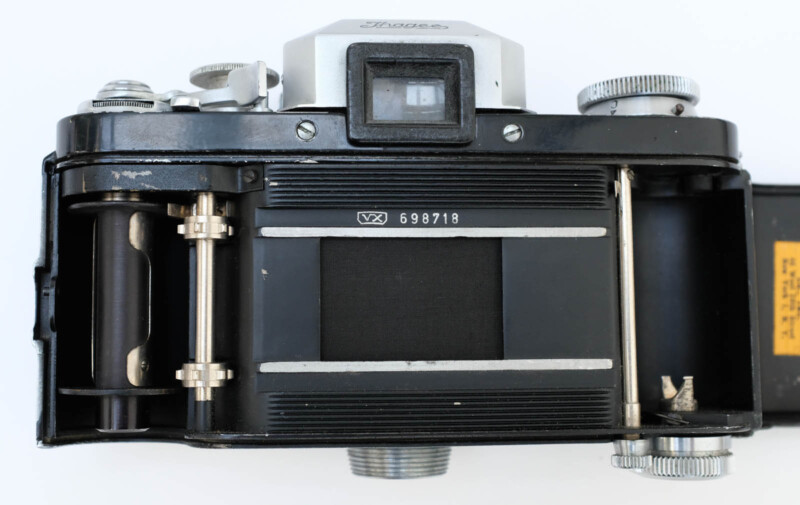
Now onto loading the camera with film. To open the back you pull down on a knob on the bottom left of the camera, and opening it up you can see a very odd feature that all Exakta cameras have – there’s a little handle that you can unscrew, with which you can slide up and down a tiny blade which is used to slice through your film. There are various uses for this, including giving you the option of having an empty second film cassette in the camera which the film can be wound onto as you take pictures, then at the end of the roll, you can cut the film, open the back and just remove the second cassette. This saves you from having to rewind the film into its original canister when you finish a roll of film – I don’t think this was ever a very popular feature though.
To load the camera with film, the film goes into the right side of the camera and is pulled to the left, which is the reverse of nearly every other film camera, you then push the end of the film into a gap in the takeup spool, make sure the sprocket holes are engaged with the sprockets, then closing up the back you to wind on the film a couple of times, set the exposure counter to 1, and the camera is ready to take photos.
Interchangeable Finders
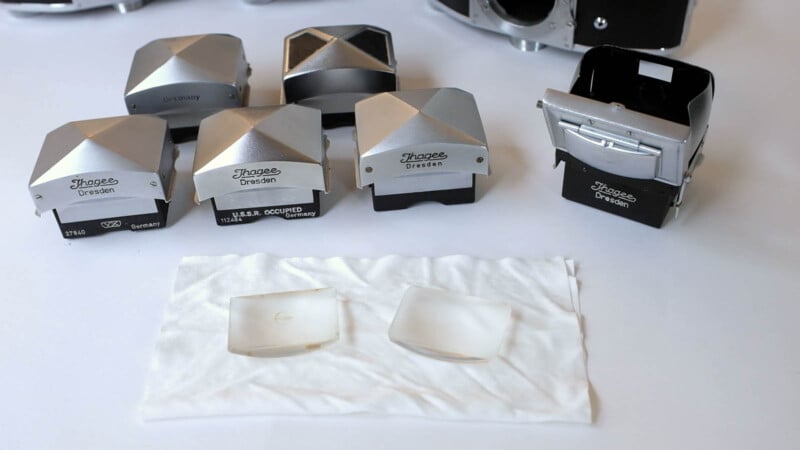
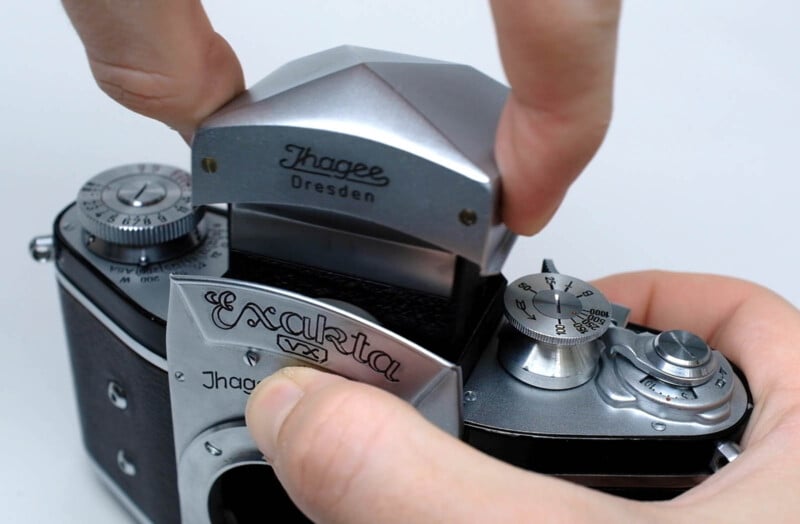
The last detail about these cameras that I have to mention is their interchangeable finders and focusing screens. While early Exaktas just had a built-in waist-level finder in 1950 interchangeable finders were added to the Exakta line allowing you to shoot either with a waist-level finder or the more advanced pentaprism finder.
To remove a finder I just press down on this release lever and lift it out. Above is a selection of some of the different Exakta finders, and as I said you have two main types – the five on the left are all pentaprism finders, and on the right is a waist-level finder.
Obviously the camera in Rear Window had a prism-type finder, and apart from the style of finder with the leatherette on top, you can see at the back (which was introduced a few years later) that any of these pentaprism finders would be a good match for our Rear Window camera, the only real differences between the rest of these prism finders are very small things which are under the surface – for example while most finders just have text saying ‘Germany’ or ‘made in Germany’ one or two of them say ‘USSR occupied Germany’ instead.
Unfortunately, just like with the cameras, finding a finder in decent condition did take a while. They’re often dented, damaged, or have optical problems – I did eventually manage to find a couple in good condition though.
Onto focusing screens. There were several different screens available for Exakta cameras, each one useful for different applications, and there are two examples in the above image, a split-image rangefinder-type screen on the left and plain ground glass on the right. When in the film we see James Stewart’s point of view looking through the camera we don’t see any centre spot or hairline cross, so just the plain ground glass screen is the obvious choice. To install the screen you just just press it into the underside of the finder, and to install the finder, just press it onto the camera.
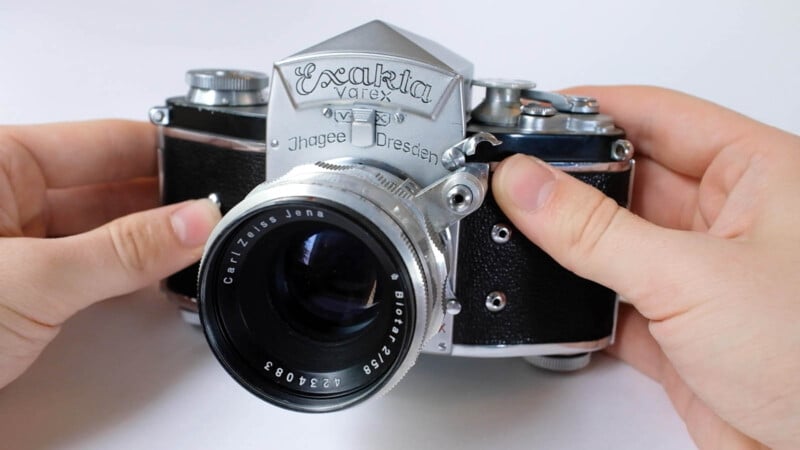
The final thing to do on the camera is to add some covering to the nameplate, like I mentioned earlier.
I bought a piece of black leatherette, which as far as I can tell is what they use to cover the nameplate in the film, I carefully cut out a piece the right shape and stuck it down with a small amount of glue. In the below image, you can see the camera now matches very closely what we see in the film.
Part 2: The Lens
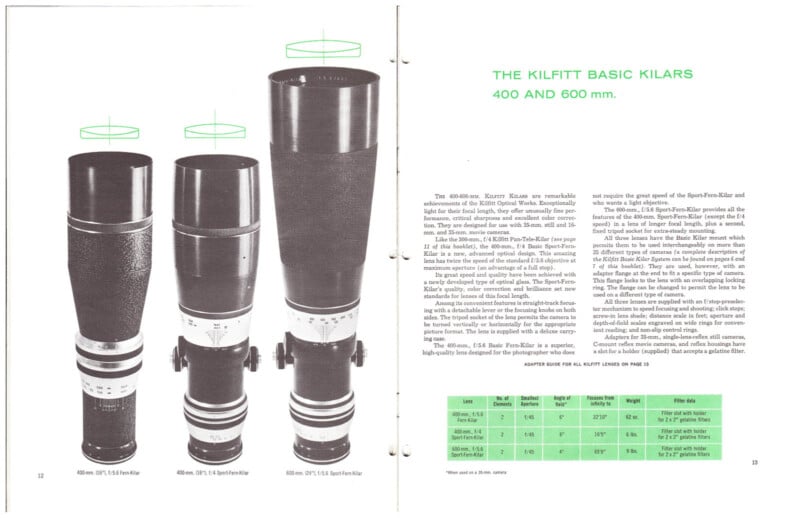
Now that I have my perfect camera, the next step step is to try to find the lens. It’s going to be the same process as finding the camera – looking at the publicity stills, doing a bit of research online, looking through a few old catalogs, and just rewatching the film – and I eventually found out I was looking for a 400mm f/5.6 lens made in Munich (so West Germany this time) in the mid-1950s by the lens maker Kilfitt, known in the 1950s and 60s for its high-quality telephoto and macro lenses.
Kilfitt
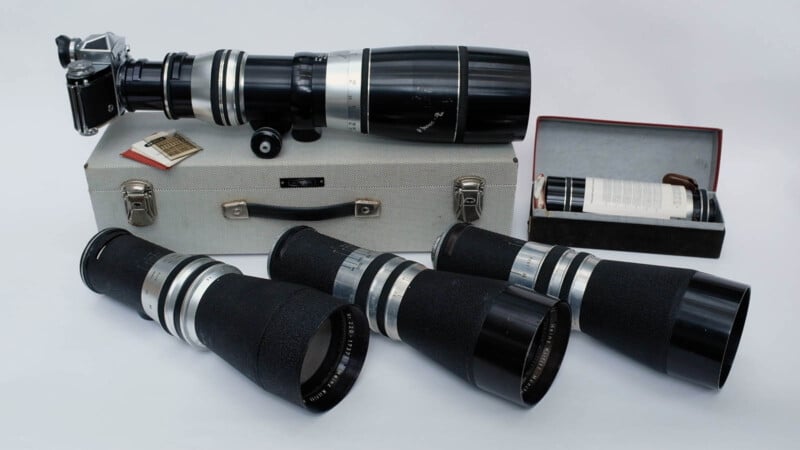
Just like with Exakta, throughout this project, I got more and more interested in Kilfitt and over the years ended up with quite a few lenses. These three lenses at the bottom are my real relevant lenses, and are my attempts at acquiring the most accurate possible Rear Window lens (and I’ll explain in a minute why I had to get three), and at the top left I have this very nice 400mm f/4 (which was the premium extra-fast version of my Rear Window lens, and I think one of the most beautiful lenses ever made) and finally on the right I have this slightly cheaper 300mm f/5.6 lens all in its original packaging.
Unlike with Exakta, with Kilfitt it wasn’t so much the history or the historical importance that interested me, it was much more their design, build quality, and attention to detail that made me want to collect Kilfitt lenses.
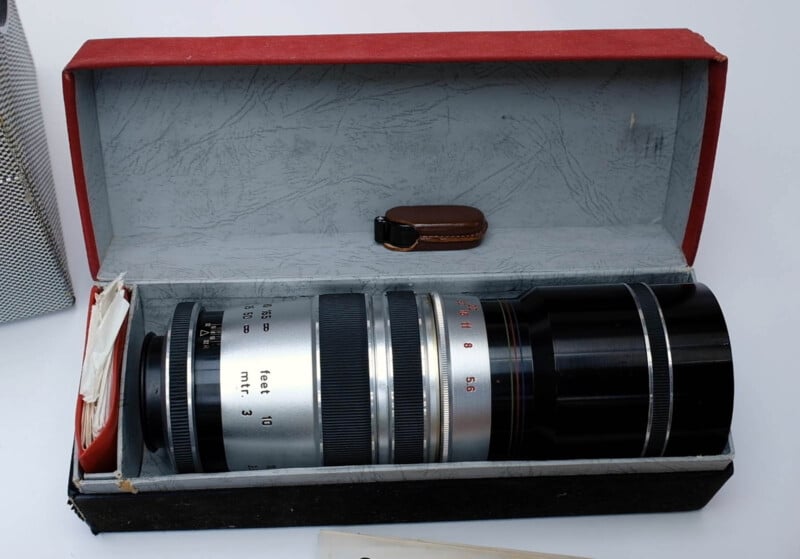
To demonstrate what I mean by build quality and attention to detail I’ll just show you what the unboxing experience of this 300mm f/5.6 lens would have been like in the early 1960s. Picking up the lens, it’s quite heavy you can immediately tell it’s very high quality, but what’s more interesting than the lens is what else was included in the box.
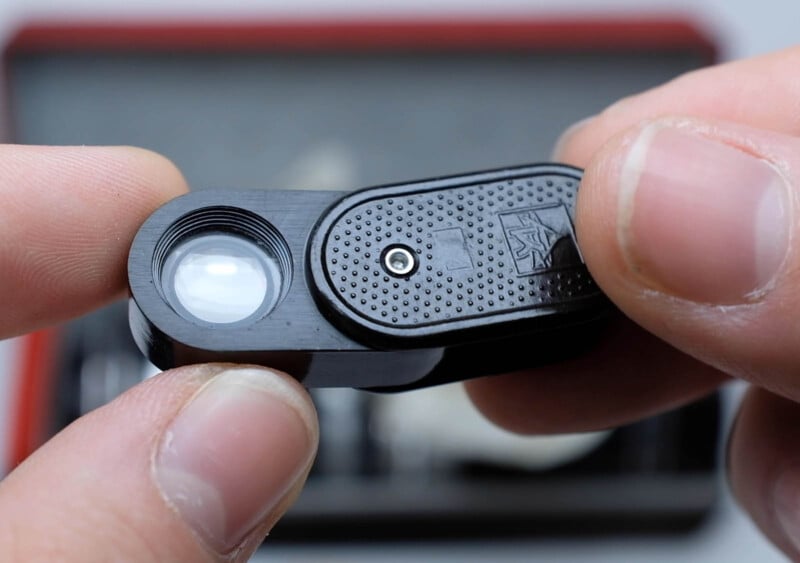
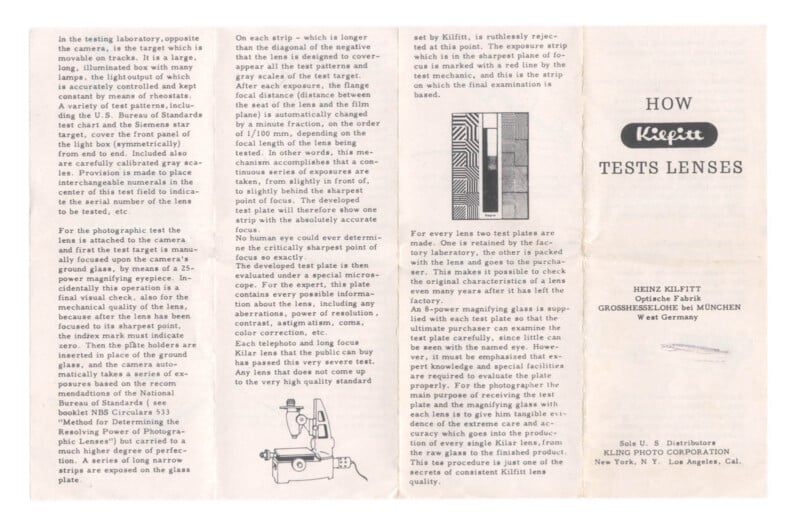
One thing that confused me at first was an object in a tiny leather case, and opening it up I found it was a tiny jeweller’s loupe. And you might wonder why a loupe would be included in the box with this lens – well the answer to that was in a little red folder to the left of the lens in the box, and looking at the contents first there’s a little leaflet titled ‘How Kilfitt Tests Lenses’, and next to it wrapped in tissue paper a mysterious glass plate.
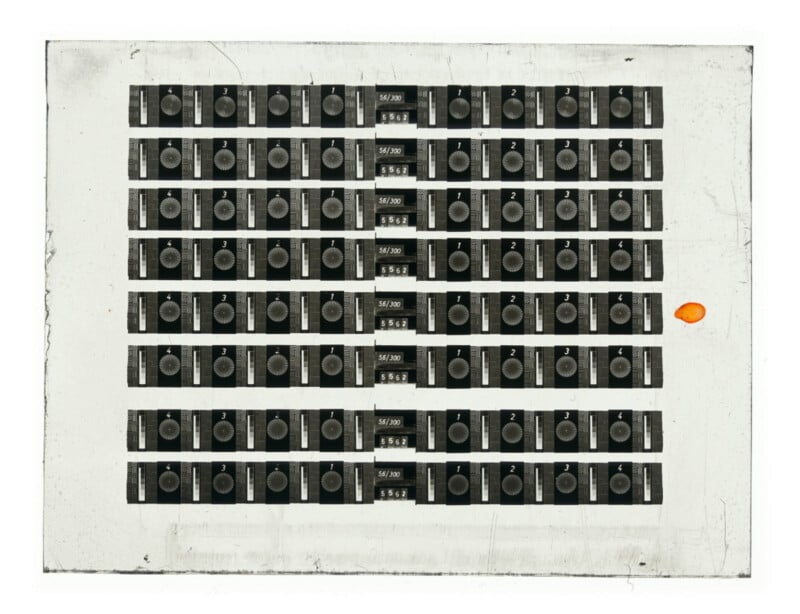
The leaflet it turns out contains an exhaustive description of all the quality checks Kilfitt does on every individual lens it sells, and where the glass plate comes in is in the final test – the photographic test – so for every lens they use a specialized camera to take a series of photos of various test patterns (each horizontal strip on the plate is a separate photo), and they do all these tests on two glass plates, one glass plate goes to the purchaser and the other is retained by the factory.
You can use your tiny loupe to carefully inspect the glass plate yourself – although I don’t particularly know what you’re supposed to be looking for, I think it’s more supposed to be just a tangible proof that Kilfitt does do all these detailed tests with every single lens they sell, which is extremely impressive, especially considering this particular lens was one of the cheaper lenses Kilfitt sold.
NASA Lens
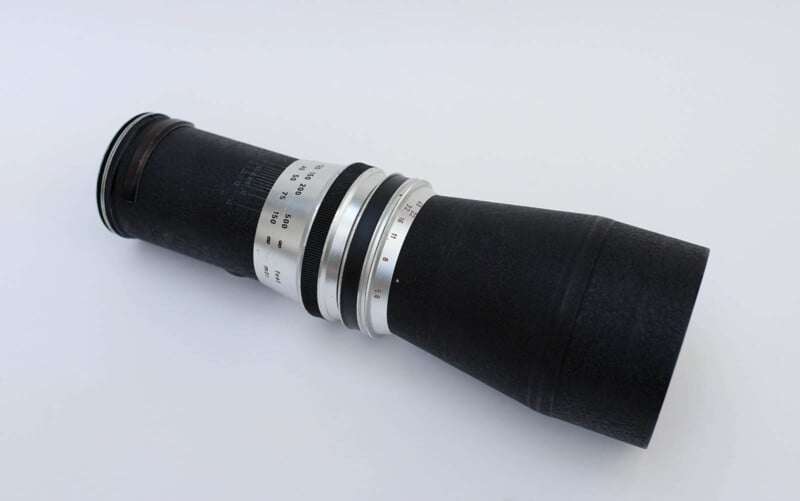
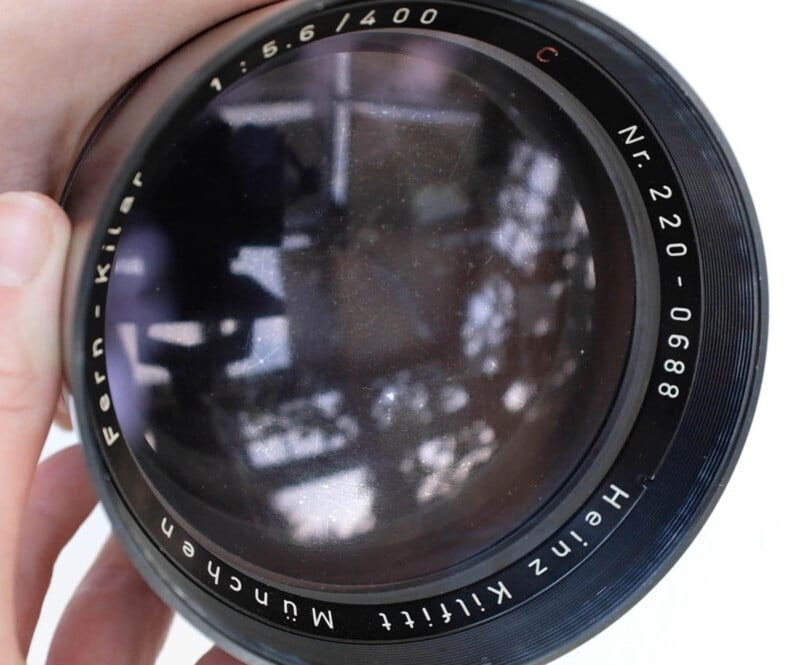
Back to my Rear Window lens. This one was the first one I purchased from eBay America and just like every other Kilfitt lens I have, it’s quite heavy and extremely high quality – but also quite basic in its features. We have the aperture ring, f/5.6 to f/45, the focusing ring – which moves the whole front half of the lens – and then there’s a drop-in gelatin filter holder, and that’s about it.
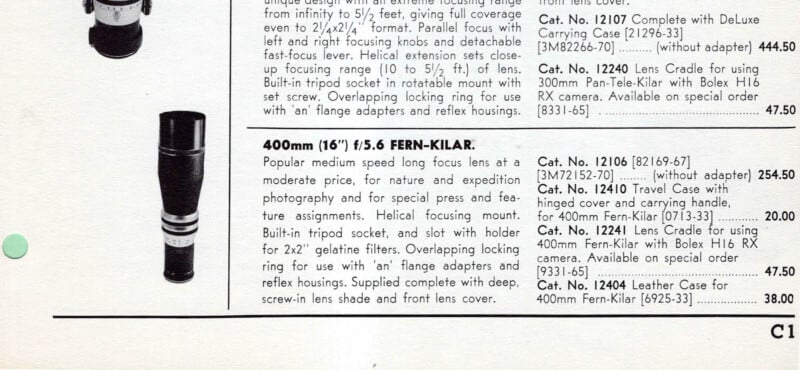
There it is in the catalog, by the way – you can see that it cost just over $250 in the early 60s, which is the equivalent of $2500, so in its time a pretty premium lens.
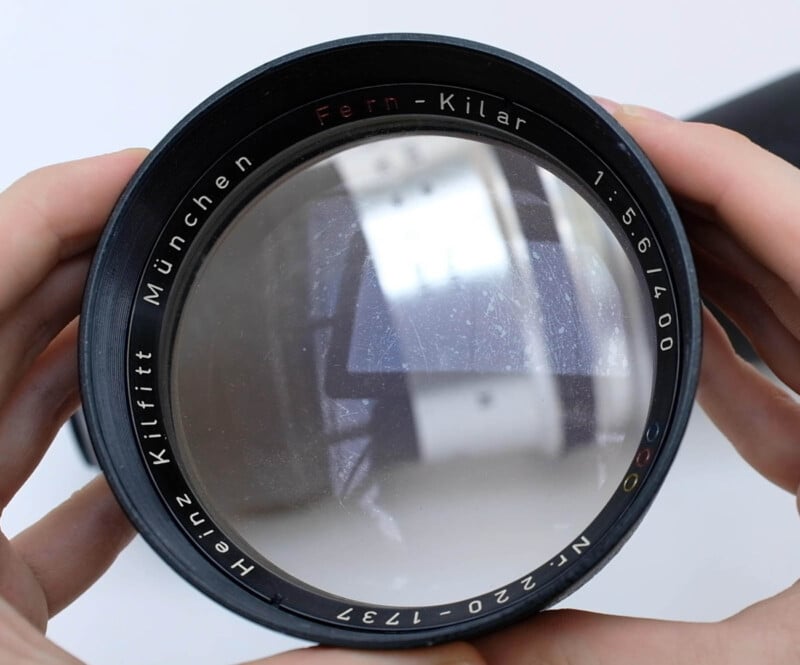
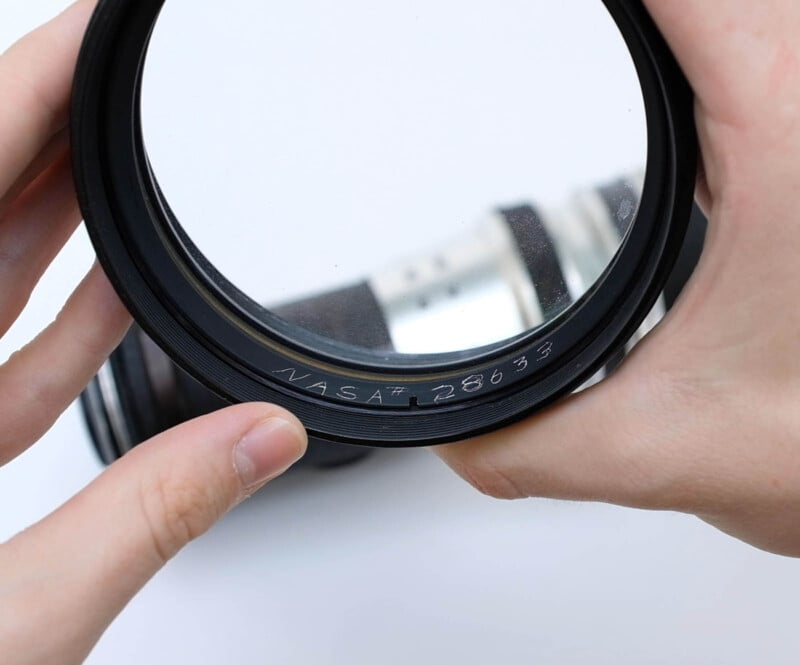
Just as an aside there was something extremely interesting about this first lens I bought, which I only discovered when I unscrewed the front section for cleaning. On the front, you can see all the standard stuff – Heinz Kilfitt München Fern Kilar 1:5.6 400 – but turning it over you can see that someone has scratched into the metal the word ‘NASA’ and the number ‘28633’.
I can’t think of any reason anyone apart from NASA themselves would want to scratch this onto the inside of this lens – I did import the lens from America, and it’s also from the early 60s, which is prime Apollo program – so who knows what this lens might once have photographed.
The Second Lens
Screwing the lens back together, I’ll now get back to Rear Window and the reason I ended up with three of these lenses.
If you remember that the camera I first purchased turned out to be a slightly different variation of the camera that we see in Rear Window – well it wasn’t long after I purchased my first lens that I realized that unfortunately the same thing had happened again, my lens was a very slightly different variation of the lens we see in the movie. I’ll now show lens number two to explain (I’ll be very brief with this as I know it is a bit dull).
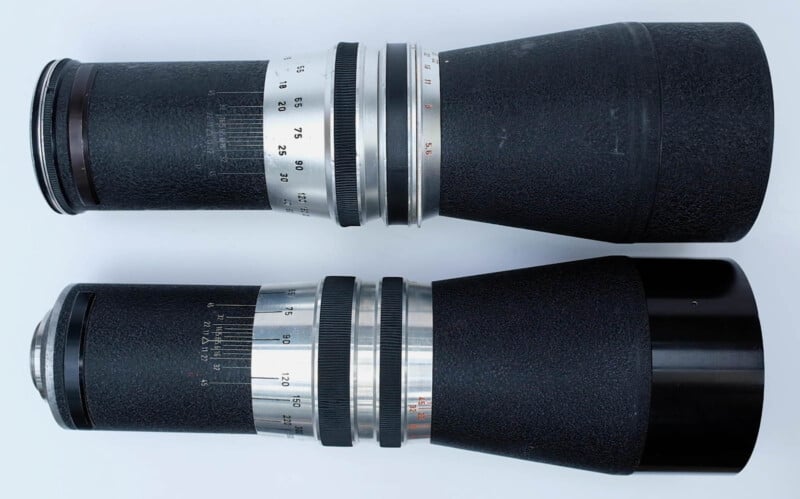
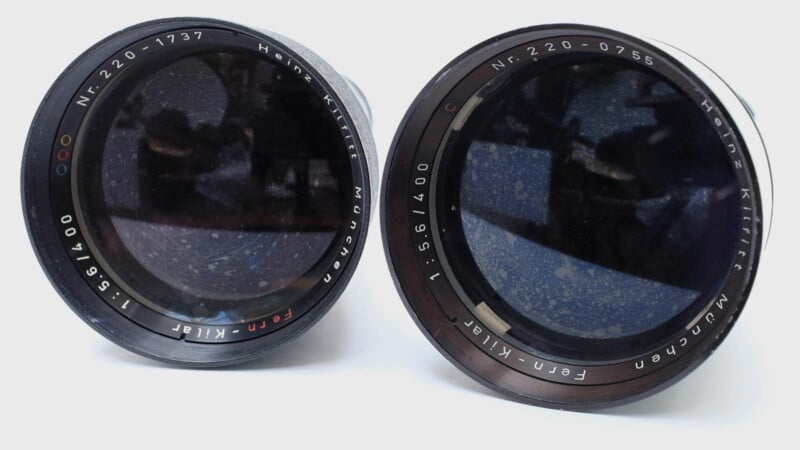
At first glance, these two lenses may look identical, but there are a few small differences. You can see for example the mounting parts of the two lenses are very slightly different, and if you look at the focusing rings you can see that there are little lines leading up to the numbers on the bottom lens whereas on the top lens, you have just the numbers. But the biggest difference (and the one which best allowed me to identify which of these lenses was the movie-accurate version) you can see if you look now just at the end sections of each lens, on the right of the above image.
You can see that on the bottom lens, the end section has a gloss finish while the rest of the lens is matte, while on the top lens, the whole thing has the same matte finish. Looking at a still from the film you can see it’s very clear – the end section of the lens has a glossy finish, which is easily distinguishable from the rest of the lens which has a matte finish.
We can now be certain that it’s the lens with the glossy end section that is the correct version, while my first lens (the fully matte one) was a different version, I believe released a few years later. From all the research I’ve done, I’m fairly certain that the two variations of this lens that I have here were the only ones that Kilfitt ever released.
Lens Condition
There is still one more lens, and the reason I had to acquire this third lens is the same reason I acquired so many cameras – I had an issue with their condition. Although I was very happy with the condition of the main bodies of my lenses unfortunately I wasn’t so happy about their optics, and if we look closely at the glass of both of my lenses in the above image you can see that there’s this odd mottled pattern just on the surface of the glass.
There are all sorts of things that can go wrong with old lenses – fungus, haze, separation, and so on, but what this strange mottled pattern is is the anti-reflective coating on the lens deteriorating, and unfortunately most of the Kilfitt lenses I’ve seen have this same issue.
While it shouldn’t affect image quality too much it does look pretty ugly, so luckily I was eventually able to find lens number three, which as you can see looks to be in much better shape than the other two – so much cleaner, and without that mottled look, and I think it’s probably about as good as you could reasonably get for a lens that’s around 70 years old.
Adapters
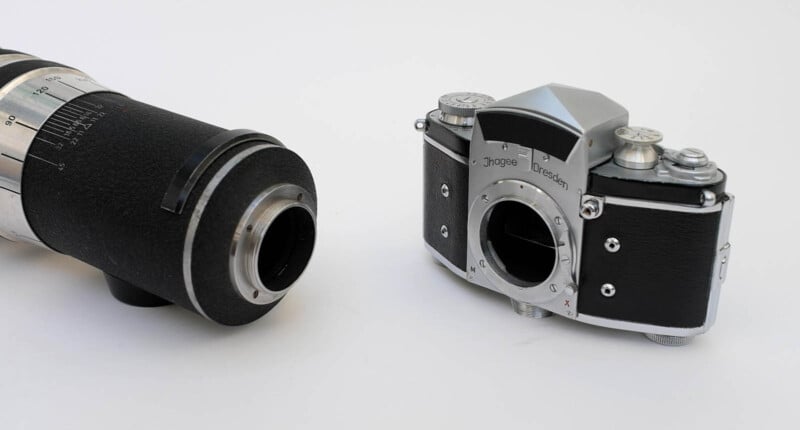
Now that I have my perfect lens and perfect camera, I can finally get on to taking some pictures – but there is one final problem. Notice that at the end of the lens, you just have a screw thread — Exakta-compatible lenses have a bayonet mount.
The fact is that Kilfitt telephoto lenses were all sold with this same screw mount, and you would have to buy a special adapter that would adapt the particular lens to your particular system – whether this be Alpa, Arriflex, Nikon, Visoflex 1, Visoflex 2, C mount or whatever – and each adapter has its codename, and there are various tables where you can look up the adapter you need.
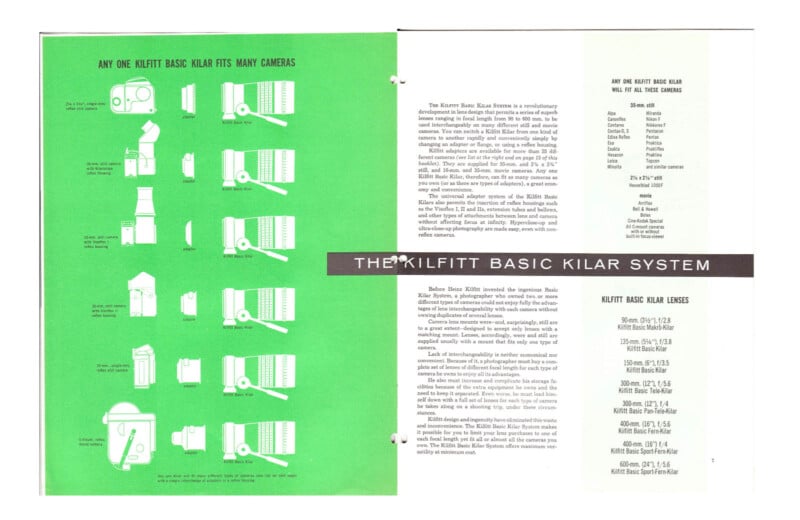
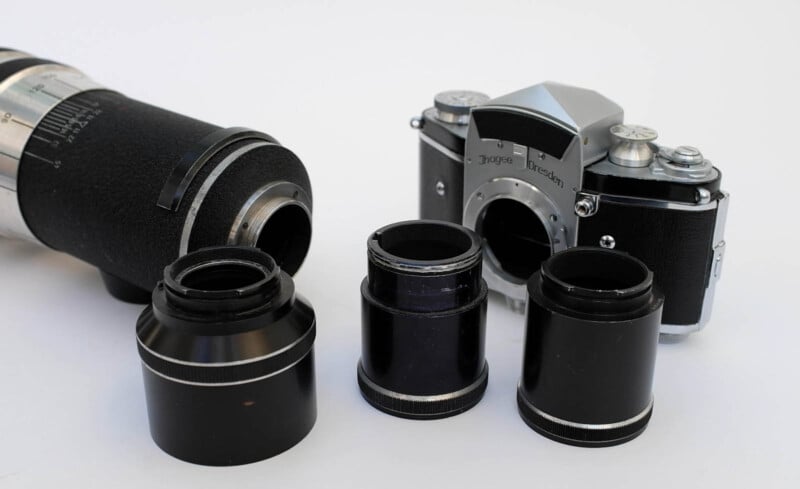
These are some of the adapters I’ve acquired over the years, and so for example in the middle is the ‘Kizar’ adapter which came attached to the first lens I bought and it adapts these lenses for use on Arriflex 16 mm cameras.
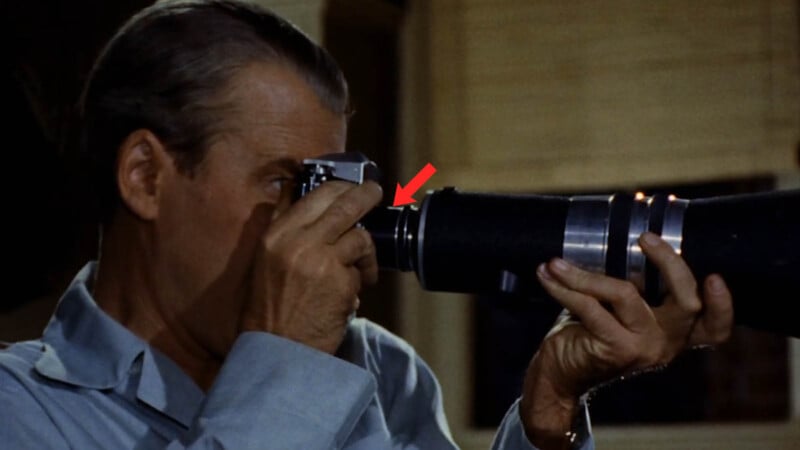
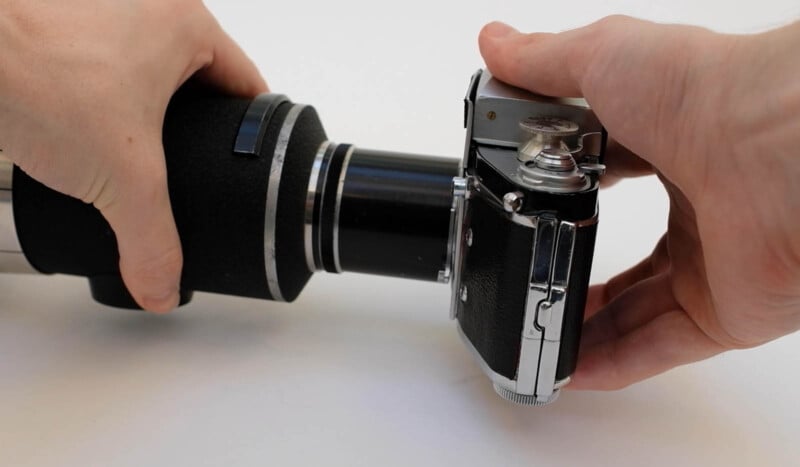
The other two adapters I have took a long time to track down and are two different versions of the adapter for Exakta with a codename ‘Kizex’. Either of these would work for my setup, but to find the movie-accurate one, we have to refer to the movie again. On the right is the clearest shot of the adapter that we get, and if you just look at the connecting part between the camera and the lens it just looks like a slim, nondescript tube – from watching clips of the movie several times, I’m sure now that the bulkier adapter is the wrong adapter, and the slimmer one is correct. And to install it it just screws onto the end of the lens, and I can finally fit the lens onto the camera.
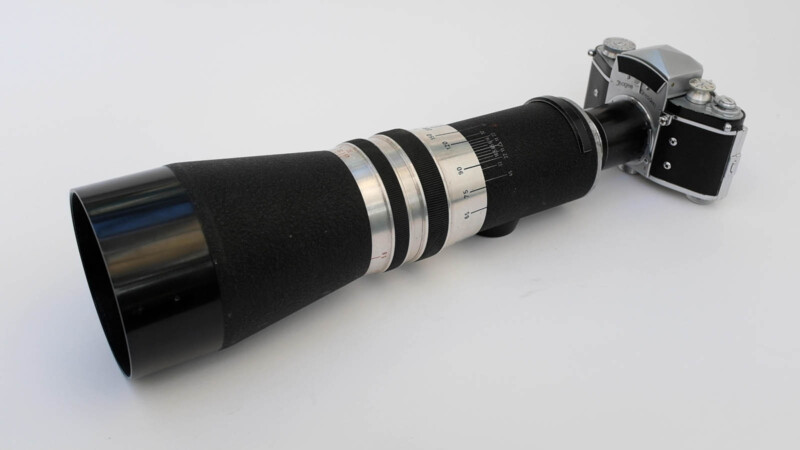
We are now finished, the setup is looking very good, and I think this is as close to the camera used in the movie as I’m ever going to get – and we’re finally ready to go out and take some photos.
Testing
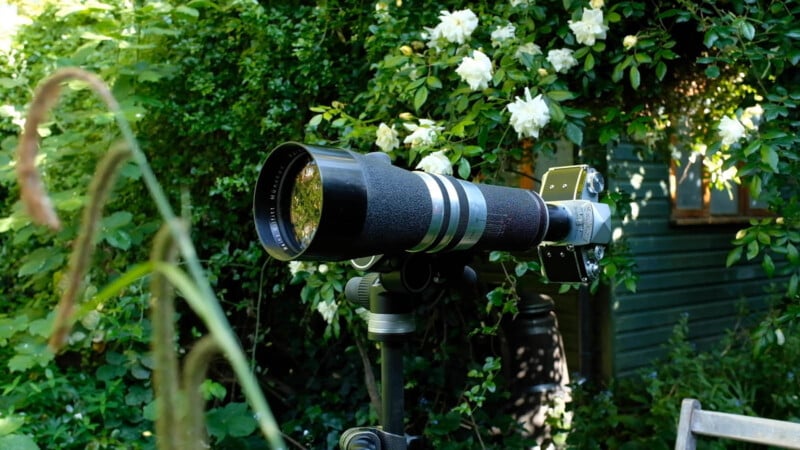
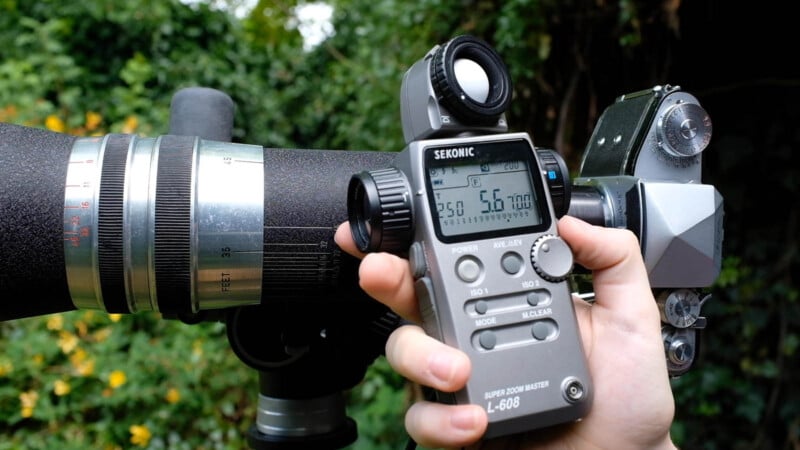
I have a couple of locations and subjects lined up to test the setup with, but as wildlife photography is one of the classic uses for telephoto lenses (for obvious reasons) I set up the camera in the garden to try to take some pictures of birds, around 10 meters away from a bird feeder (10m being the minimum focusing distance of the lens). Starting by framing the shot and getting the bird feeder into focus, I then take a reading with my light meter – at 1/250th of a second at f/5.6, and I’m shooting at f/5.6 (the lens’s maximum aperture) just so I can then use the shortest possible shutter speed, which is what you want for wildlife photography. Then I set the shutter to 250 as per the meter, and all I have to do is wait for a bird to come along.
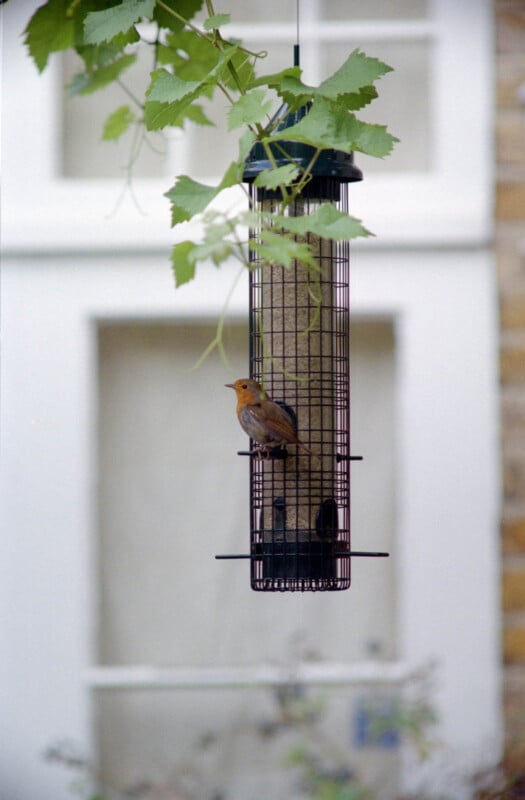
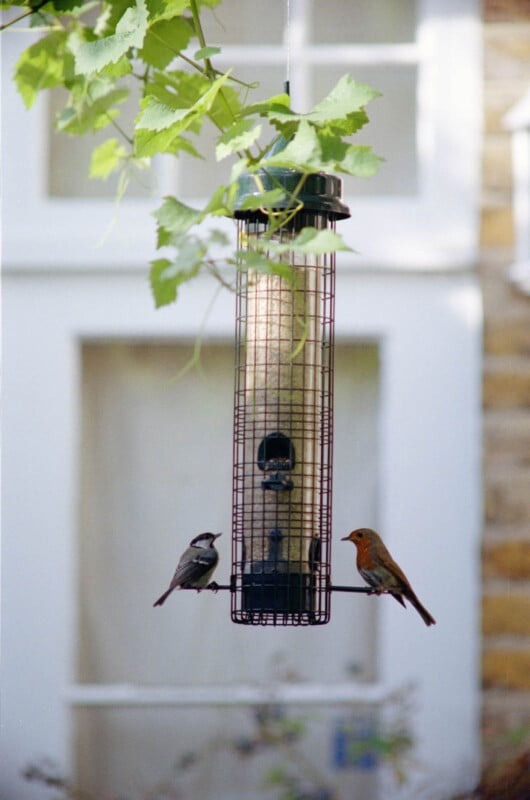
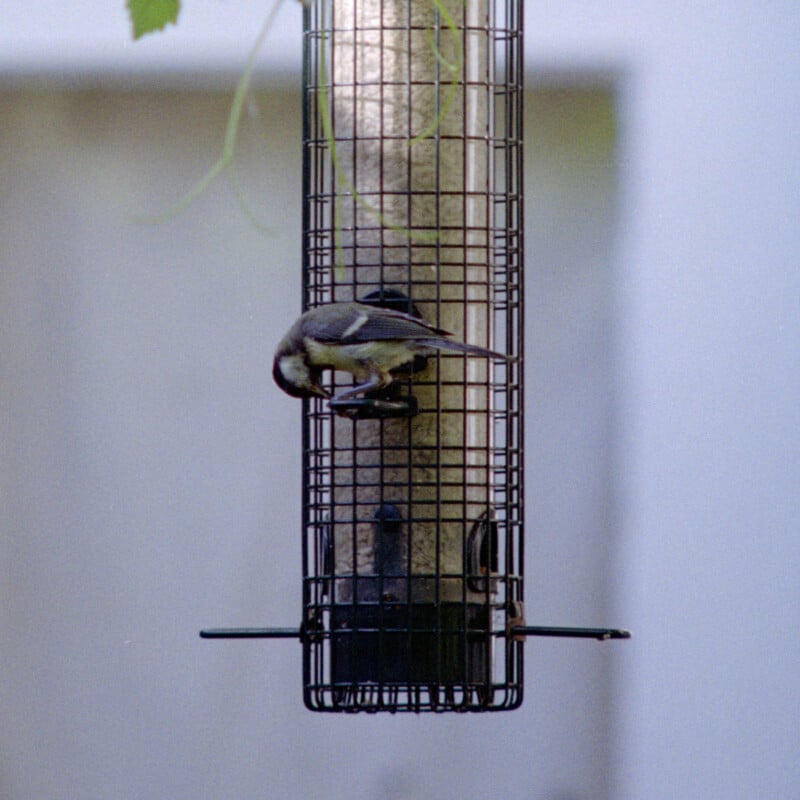
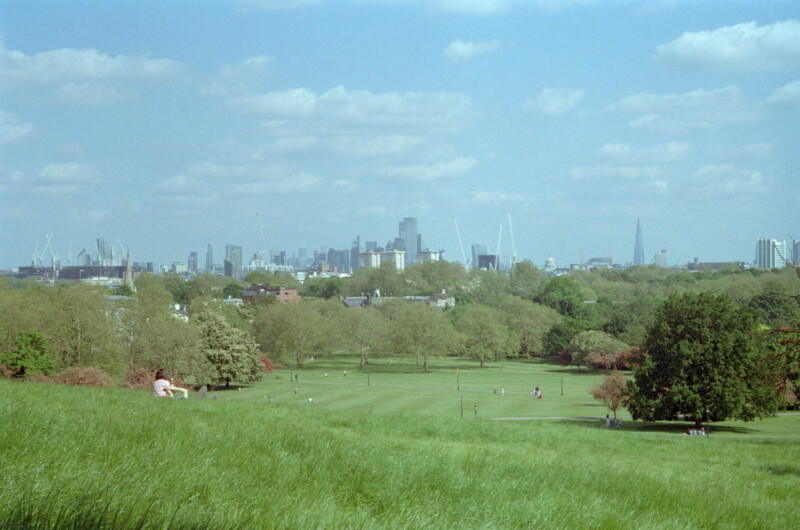
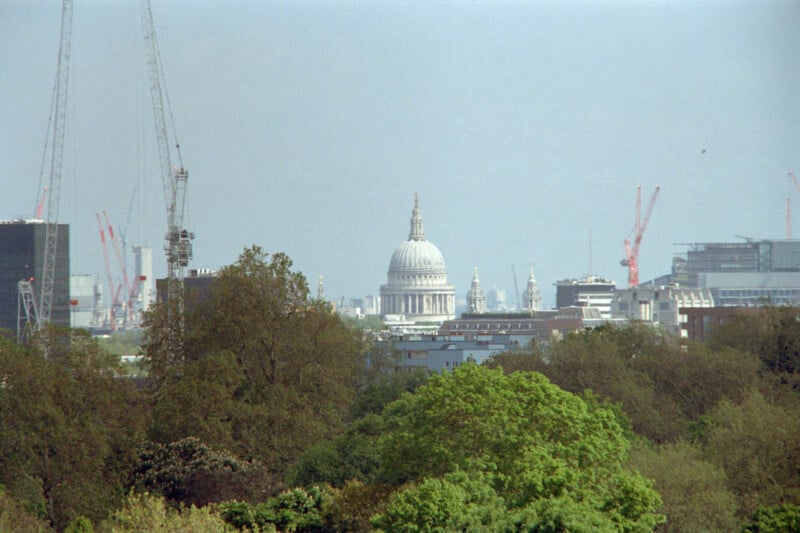
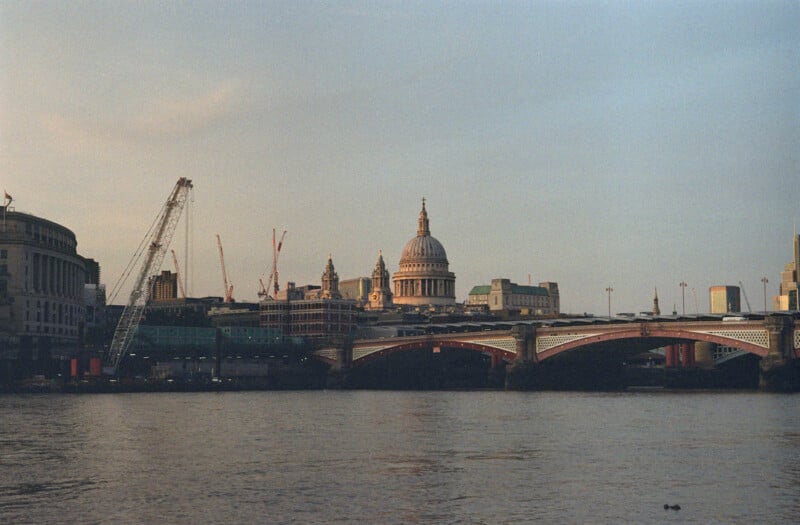
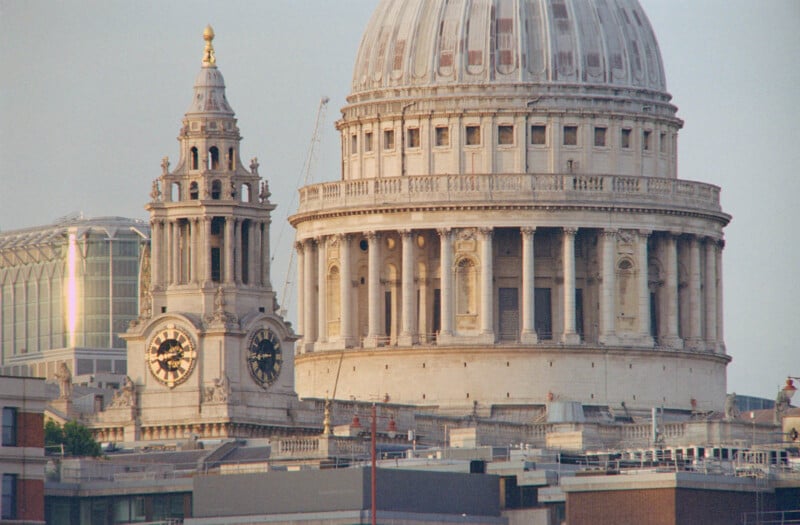
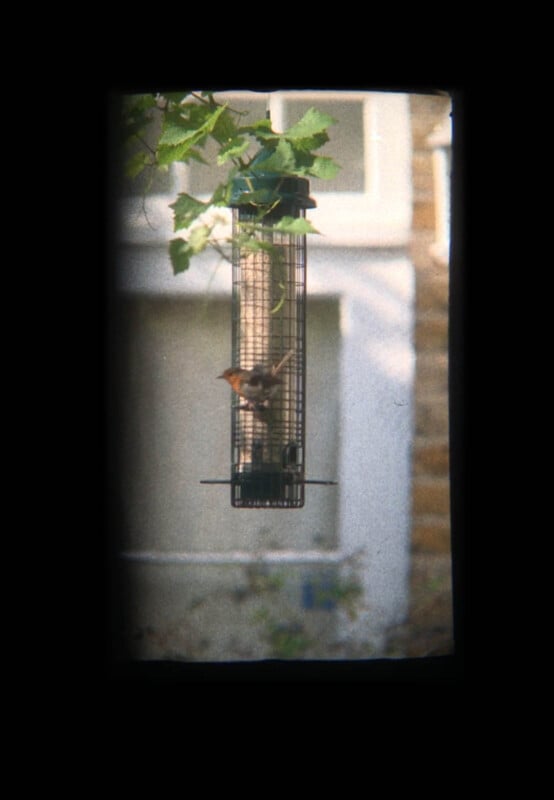
I’m just going to take a moment now to review some of the photos. So apart from the garden, the other locations I took pictures at were Primrose Hill and South Bank, London, and there were some good pictures taken in those two places although generally they were a little bit soft.
I think the bird pictures were most successful, and I think surprisingly sharp especially considering I was shooting at the lens’s maximum aperture. Just for comparison above I included two photos taken with my Biotar 58mm, which is the lens I have on the camera most of the time – and I don’t usually use telephoto lenses at all really but some of the photos did come out quite well, so I’ll have to try to think of more applications for this setup.
This project was a lot of fun but it did take much longer than I expected – some of the adapters especially took years to track down – so I’m glad it’s all now finally complete.
About the author: Thomas Bloomfield is a film photographer and YouTuber who creates content about analog photography. You can find more of his work on his YouTube and Instagram. A video version of this article was published here.